
“Tell me about that buck you killed!” the question was asked by my colleague at work. I thought about it for a minute… “Well, there isn’t much to the story of the afternoon of the hunt, the bachelor group walked into the food plot about the time I expected, they fed into 18 yards and I took the shot. The real story is that I killed this deer before the hunt began,” I responded. “What do you mean?” my colleague added. And that is what inspired this article. In the tutorial below, I will outline a process I’ve developed over my lifetime of early season deer hunting. Its roots began before today’s technology, but using today’s technology makes it easier and less time-consuming. I hunt in the Coastal Plain of East Alabama, but if you apply the concepts below to your neck of the woods, you will get an opportunity to kill a buck in the early season.
Step 1: Find a Mature Buck Consistently Using a Food Source
The very first step in early season deer hunting is locating a mature buck that is daylighting on a consistent food source. My experience is that bucks will be using the same consistent food source for up to a month before opening day. In my neck of the woods, I aim plant my food plots between September 11-September 26th, and assuming I get enough rain, those food plots will be providing forage for 3-6 weeks before opening Day (October 15th for us). This could be applied to ag fields, feeders, or feed trees like persimmons or White Oaks. Timing will vary depending on your specific location.

I use a cellular trail camera to monitor these food sources, but you could accomplish the same with a traditional camera or by glassing the location. The latter two options are way more time-consuming, and I’ve noticed that bucks may use these food sources in daylight very inconsistently. If you were to glass the location, you may have to sit there for weeks to notice the same pattern you can gain from a cellular trail camera.
Step 2: Map the Historical Weather Patterns When Bucks Daylight On The Food Source
Understanding how wind direction impacts buck movement is one of the biggest keys to early-season deer hunting success. My experience is that mature whitetails will only enter a food source on a wind that they feel comfortable with. I hypothesize that mature animals, bucks and does, have learned to scent check their food source before feeding at that location. Think about how many times you’ve hunted a food source, and right about prime time, you heard a deer snorting just out of sight? They smelled you. I pay zero attention to when a deer uses a food source at night. I can’t hunt them at night, so these data points are immaterial to me, at least for the purpose of creating this pattern.
Once you have multiple photos of a target buck, in the daylight, you have a pattern. This pattern will give you the information you need to know to determine where these bucks likely bed. Here’s how you determine that. I use Weather Underground, specifically the “weather history” feature, for my hunting location to look at the wind direction for the time period that the buck daylighted that food source. What I have noticed on multiple bucks and bachelor groups over the years is that there is a general direction that they feel comfortable entering a food source in the daylight. For example, bucks will feel comfortable on Northerly, Southerly, Easterly, or Westerly wind directions.
Once you have determined the general wind direction that the target deer feel comfortable with, you can estimate where these bucks generally bed. On the most recent successful hunt I had using this blueprint, I noticed that the bachelor group I was hunting would only enter my food plot on a Westerly wind. I had daylight photos on NNW, NW, WNW, W, WSW, and SW winds, but NEVER daylight photos on any Easterly winds. Seeing this pattern, I was able to determine that these bucks likely bedded to the East, Northeast, or Southeast of the food plot.
Step 3: Reverse Engineer A Stand That Takes Advantage of a Wind Edge
You’re almost there now. You know generally where they bed, exactly where they feed, and all that’s remaining to do is select a stand location that allows you to take advantage of the wind that they feel comfortable with, that also doesn’t allow them to smell you while they either lie in their bed or transition towards the food source. You also need to be able to access this stand location without letting your scent blow into the bedding area. When you understand the general flow of the game from bedding to feeding, how to position your stand and access it will become very evident. Look at the image below.
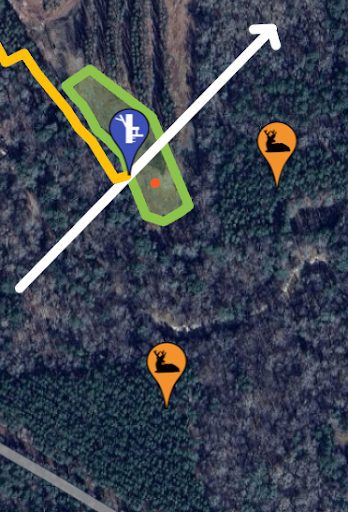
What you see in this image is the actual location where I took the buck referenced in the opening paragraph. The red dot inside the food plot is my camera location. The orange markers are the suspected bedding locations based on historical weather data. The blue marker is where I decided to hang my treestand. The yellow line shows my ingress/egress trail, and the white line shows a Southwest wind, the only wind I could use to give the whitetails what they needed to feel comfortable entering the food plot without smelling me. This setup is a perfect example of how careful planning pays off in early-season deer hunting, when wind direction and access can make or break a hunt.
Step 4: Hunt A Perfect Wind – Unless You Do this
The opening day weather forecast brought the Southwest wind I was looking for, a rare case. As I donned my gear and left the camp, I felt a strong wind on the wrong side of my face. Checking the wind, I realized it was actually an East wind! Frustrated, I chose a different stand location where I felt comfortable in an East wind. As I sat in the stand that afternoon, at various times, the wind blew from almost every direction on the compass, but right around prime time, it settled into the SW wind that was forecasted. I checked my cell cam to see that the bachelor group I had been patterning entered the field well within daylight and walked directly below my treestand. I knew what I needed to do.
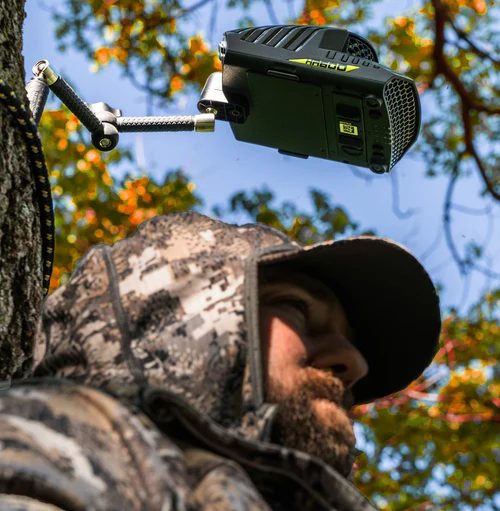
The next day, the forecast was the same: Southwest afternoon winds. Knowing that it would likely swirl again, I decided to hunt the bucks, but this time with an ace up my sleeve, an ozone generator. There is a lot of snake oil and pseudoscience that gets marketed to hunters, but as I’ve written about before, ozone is not one of them. It works by disrupting the way your scent smells to a deer, effectively rendering your scent unrecognizable and unalarming to a whitetail. I’ve torture-tested ozone generators, trying to get smelled because I was very much a skeptic. Think of it this way, if you smell gas around your home, that is alarming to you, but what if there was a device that could make the smell of gas smell like the earth after a rain? That is basically what an ozone generator does. They work.
Here’s the thing: I live 4 hours from my property, and I have two young children, a marriage, and a business that I have to be there for. I get to hunt on weekends when one of the three mentioned previously doesn’t need me. This means I’m subject to hunting on the winds of the day. An ozone generator allows me to hunt on winds I’d otherwise not be able to. If you find yourself in this camp, get one. I’m particularly fond of the Ozonics HR600, the lithium battery gives me plenty of run time, it’s unnoticeably quiet in the stand, the mounting arm is intuitive and simple to set up, and it has two red LED lights that allow me to setup or gather my gear in the dark.
The Ethics of Using Technology in Hunting
As I mentioned, the real hunt for this buck began weeks before by using modern technology. I’ve deployed this tactic on many other early-season deer hunting opportunities and will continue to do so in future seasons. I often struggle with whether or not I should use technology in my hunting. The cellular trail camera and ozone generator mentioned in the previous blueprint certainly make it possible for me to scout without having to put boots on the ground and hunt without having the perfect wind. Do I currently kill more deer because of them? Absolutely, but could I kill these same deer without them? Yes, but it would require many more hours in the woods, which would take me away from other important aspects of my life, such as being an available parent, husband, and team member in my business.
The litmus test I give myself to establish my own ethics is as follows: Is the technology I’m using causing me to hurt the resource or help it? Are the choices I’m making with the legal means of hunting affecting my neighbors up or downstream negatively or positively? In my case, having detailed game camera photos makes me a more selective hunter and allows me to make better management decisions. This is not only good for the resource, but it’s good for my neighbors as well. Ask yourself these questions before you consider your next hunting strategy, conduct yourself accordingly, then get outdoors and enjoy God’s creation.
